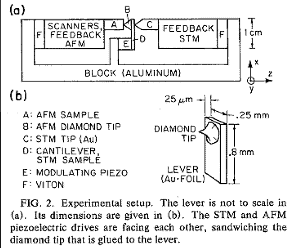
Fig. 1. Experimental setup of first Atomic Force Microscopy system from paper Binnig, Quate and Gerber (Phys.Rev.Lett.56,930 (1986)).
Despite of the great success of the Scanning Tunneling Microscopy it was obvious that STM has fundamental disadvantage - with STM one can investigate only the conductive or conductive layers coated samples.
This disadvantage was overcomed due to the invention of atomic force microscope by Binnig [1]. He was first who have guessed that under interaction with sample surface macroscopic cantilever provided with sharp tip can be bended by atomic forces to sufficiently large amount to be measured by the common facilities. In first embodiment to measure tip displacement was used STM (see Fig. 1) [2]

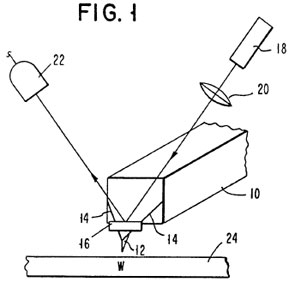
Fig. 2. Schematic sketch of AFM from Patent "Atomic Force Microscope" (US RE37,299).
For registration of cantilever bending many methods was used, but currently mostly useful and widely used is method invented by Amer and Meyer (see Fig. 2) [3]. According to them an atomic force microscope includes a tip mounted on a micromachined cantilever. As the tip scans a surface to be investigated, interatomic forces between the tip and the sample surface induce displacement of the tip and corresponding bending of the cantilever.
A laser beam is transmitted to and reflected from the cantilever for measuring the cantilever orientation. The reflected laser beam is detected with a position-sensitive detector, preferably a bicell. The output of the bicell is provided to a computer for processing of the data for providing a topographical image of the surface with atomic resolution.
Currently used position-sensitive detectors are four-sectional that allows measuring not only longitudinal but torsion bending too.
Cantilever can be bended not only by the direct contact forces under the tip-sample surface interaction, but also by far-ranging forces: van der Waals, magnetic, electric etc. Cantilever can vibrate under scanning as firstly was proposed by Binnig [1]. Vibrating can proceed in direct contact of the tip with the sample surface, without touching the surface under vibration and with Intermittent-contact ( Semicontact) under vibration. Scanning can be many-passing, each next pass can give additional information concerning sample under investigation.
All this abilities generate many techniques and modes of SFM operation. Below we will consider various dc and ac Contact, Semicontact, Noncontact and Many-pass techniques and modes.
References
- US Pat. 4724318.
- Phys.Rev.Lett.56,1986,930-933.
- US Pat. RE37,299 (Reissued Pat. No. 5,144,833).
